

This is the first part of an ongoing series to introduce the basic concepts of 3D graphics.
The mission to explain 3D graphics has been attempted by many authors, but in my efforts to get into these new worlds, I couldn’t find any articles that brought its main concepts back to earth without retorting at some point to some elaborate theories of linear algebra.
The purpose of these series is to make 3D graphics accessible to people who just have an interest in learning “what’s it all about”, without necessarily planning to apply these concepts in real programming; or for developers who are just starting their forays in 3D programming and need some material to get motivated and conduct their research.
Let’s start the journey through the 3D world!
In 3D graphics, we represent our objects as a collection of triangles. “Why triangles?” is one of the questions that immediately comes to mind. Well, for starters, any surface can be approximated using triangles, but apart from that, every triangle shares the property that it can never be non-planar.
A polygon is planar if all its points lie in a certain plane. This can be better observed in the following figure.
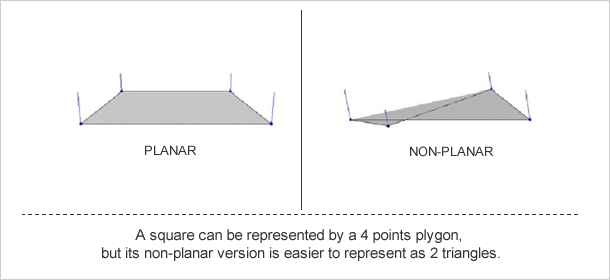
Since it takes a lot of calculations to make sure all points are coplanar, it’s much more efficient that all polygons with more than 3 points are pre-calculated by decimating them into triangles.
Altogether, 3D rendering isn’t much more than determining the screen position for each vertex (a fancy name for a point) of each triangle, and then performing some computations to determine the colors of each pixel inside them.
To achieve this, each of our geometry Objects, must store certain information that, regardless of the specific API we’re using (OpenGL, DirectX) should always be present.
Mapping: Understanding the basics
Let’s start with the basics then. The first things we need to compose a triangle are three vertices. But we don’t need to stop there; other attributes can be assigned to associate all kinds of data. For example, we may associate a Color (as a 3 number RGB value), a Normal vector describing how lights should reflect from its surface (allowing a low-polygon model to have depth) or a UV coordinate to let the API know how textures should be glued onto each triangle.
The color for the area inside each triangle is computed by blending the color values associated with each of the three vertices. The blending ratios used are related to the pixel’s distance to each vertex.
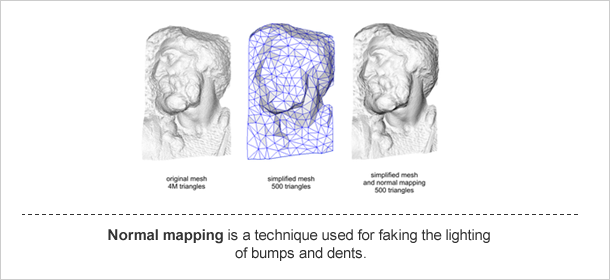
The technique of adding a Normal vector to each vertex is called normal mapping and is used to greatly enhance the appearance and details of a low polygon model by generating a normal map from a high polygon model or height map.
In the case of textures, the process is called Texture Mapping, and is a method for adding detail, surface texture or color to a 3D model. To achieve this, every vertex in a polygon is assigned a texture coordinate (which is also known as a UV coordinate). Image locations are then interpolated across the face of each polygon to produce a richer visual result.
Another structure that plays a vital role when rendering polygons is the array of indices. This array dictates the order in which each vertex must be rendered. It’s very important to determine if the polygon is facing toward or away from the viewer, which in turn will allow us to enable back face culling (don’t render the face that can’t be seen). Being accepted by most modern graphics hardware, using vertex indices is the most widely used representation.
Stay tuned, there is more coming!
So, to sum things up, a basic geometry Object is composed of an array of Vertices (to determine the shape), an array of Indices (the order in which we should render each vertex), an array of Normal vectors (to simulate lights and depth efficiently), an optional array of Colors (to determine the color of each triangle) and an optional array of UVs (obviously associated to a texture, so the renderer knows how to glue the different parts of the image around the triangles).
This is just the beginning, there’s still a lot more than we can do with our 3D Objects. In the next part of the series we’ll learn how all these attributes come together and allow us to place, move, scale or animate our models inside a virtual world.
Don’t forget to visit our blog for the latest news from our developers. Also, obtain more useful information on how Making Sense’s high performance team of developers can assist your company to save money, develop applications in record time, and build a loyal base of customers.
We hope you have found our post useful and understood the basics of 3D Graphics. Tell us, is there anything specific you would like to know about the 3D world? We love your feedback!